It is a simple tutorial that will teach you how to create and use actions in Photoshop. If you are new to Photoshop, you may find yourself repeating the same steps over and over again, because you like the effect that certain adjustments have on your photos. Thanks to Photoshop “actions,” which are basically just a series of steps that can be recorded, by pressing one button, and can be applied to your photo – very similar to a Light-room preset. You can easily create your own actions in Photoshop to simplify your work.
Video Walk-through
I will start opening an image in Photoshop.
Step 1: Get Action Pallete from Window Menu
Step 2: Create a Custom Action Group
Click on the folder icon, Create New Set. You will then a box box, at which point you can rename your folder if you want for easy identification, especially if you have a lot of actions stored in Photoshop.
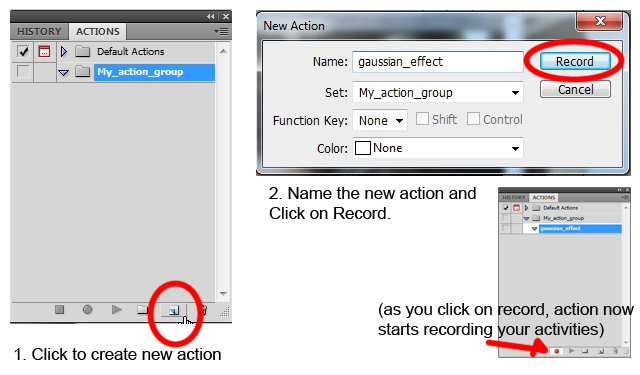
Step 3: Create a New Action
With your new set selected, click the Create New Action icon, circled in the figure.
Step 4: Create a duplicate layer
To create duplicate layer, select the background layer and press Ctrl + J or right click on the background layer and click on Create duplicate layer. This action will be recorded that you can see in action pallete.
Step 5: Apply some adjustment to the layers
The best thing you can do when you are writing actions is to work with Adjustment Layers. So, every time you want to apply an effect to your photo, select Layer, New Adjustment Layer, and then the type of adjustment you want to make. Adjust Levels Click on Image --> Adjustments --> Levels Set Levels as shown in the figure.
Apply Gaussian Blur
Set Blend mode to Soft Light
Step 6: Stop recording Action
Go to Action Palette and click on Stop Icon as shown in the figure below;
Step 7: Open new image in Photoshop
Step 8: Apply Action to get the result
As we have already create an Action named "gaussian_effect" in My_action_group set, we can simply play that action from action palette to apply it onto the new image.
Result:


What a great tutorial on photo editing tips. I just loved the tutorial. I found it very informative. Thanks for the share.
ReplyDelete