Saturday, October 20, 2012

How to save and load Actions in Photoshop?


Once you finish recording Actions (see how to record action in Photoshop?) in Photoshop, you may want to save it to avoid the risk of losing it on any kind of crash in your Photoshop. Thankfully, Adobe has made it easy for us to save and load our actions. 


Video Walk-through


Saving Actions In Photoshop


Note: Photoshop does not allow us to save individual actions. We can only save Action Sets. So if you record or edit an action and want to save it, you'll need to select and save the entire action set. So I suggested that you should avoid placing your own actions inside default action sets that comes with Photoshop. Keep all of your actions inside your own action sets, which will make it easy to save them, load them, and keep them organized.
Here we go,To save an action set, first select the set you want to save in the Actions palette. We should have a couple of actions inside your Action Set. For now, I have "My_action_group" set - the "gaussian_effect" action that I created in the previous tutorial. I want to save this action set, so I'll select it in the Actions palette.
save and load action in Photoshop
With the action set selected, click on the menu icon in the top right corner of the Actions palette, or if you're using Photoshop CS2 or earlier, click on the small right-pointing arrow. This brings up the Actions palette's menu. Click on Save Actions.
Photoshop will then pop up the Save dialog box. Save your action set to a location on your computer where you'll be able to easily access it later. I've created a folder on my Desktop named "my_actions" and I'll save the "My_actions_group" set into this folder. This will make it easy for me to find the action set later if I need to load it back into Photoshop. Make sure you save your action set with the extension ".atn" after the name if you want your actions to be playable on both a PC and a Mac. When you're ready, click on the Save button in the dialog box to save your actions.
Your actions are now saved. If Photoshop crashes at this point, your actions will be safe and you can load them into Photoshop the resides on any PC.
Resetting the Actions Palette to Defaults
Now as we've saved our actions, let's clear every actions leaving the Default Action Set. For this, click on the menu icon in the top right corner of the Actions palette, or the small arrow if you're using a version of Photoshop prior to CS3, and then click on Reset Actions from the menu.
Photoshop will pop up a warning box  asking if you really want to replace the existing actions with the Default Actions set. Click OK to close the dialog box and reset your actions.

Loading Actions Into Photoshop
Now that we've cleared out our Actions palette, let's load the action set we saved a moment ago. Click on the menu icon top right corner of the Actions palette to bring up the menu, then select Load Actions from the menu choices.
This brings up the Load dialog box. Navigate to where you saved your action set on your computer, select the action set, then click on the Load button in the dialog box. My action set was saved to a folder named "my_ations" on my Desktop, so that's where I'll navigate to. I'll click on the "My_actions_group" set, then I'll click Load.
And now, if we look once again in the Actions palette, we can see that the "My_action_group" set has been successfully loaded back in to Photoshop.
You might have noticed that how the action set appears already twirled open in the Actions palette. That's because it was twirled open when I saved it. Action sets will appear either opened or closed after being loaded in to the Actions palette depending on how they appeared when they were saved.
We've now covered everything you need to know to get up and running with Photoshop actions! Cheers!!

Thursday, October 18, 2012

How to Create | Record Action in Photoshop?


It is a simple tutorial that will teach you how to create and use actions in Photoshop. If you are new to Photoshop, you may find yourself repeating the same steps over and over again, because you like the effect that certain adjustments have on your photos. Thanks to  Photoshop “actions,” which are basically just a series of steps that can be recorded, by pressing one button, and can be applied to your photo – very similar to a Light-room preset. You can easily create your own actions in Photoshop to simplify your work.

Video Walk-through


I will start opening an image in Photoshop.


Step 1: Get Action Pallete from Window Menu
Step 2: Create a Custom Action Group
Click on the folder icon, Create New Set. You will then a box box, at which point you can rename your folder if you want for easy identification, especially if you have a lot of actions stored in Photoshop.

Step 3: Create a New Action 
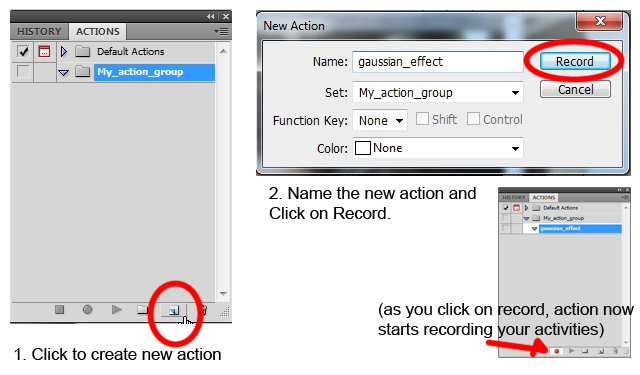
With your new set selected, click the Create New Action icon, circled in the figure.

Step 4: Create a duplicate layer 
To create duplicate layer, select the background layer and press Ctrl + J or right click on the background layer and click on Create duplicate layer. This action will be recorded that you can see in action pallete.
Step 5: Apply some adjustment to the layers 
The best thing you can do when you are writing actions is to work with Adjustment Layers. So, every time you want to apply an effect to your photo, select Layer, New Adjustment Layer, and then the type of adjustment you want to make. Adjust Levels Click on Image --> Adjustments --> Levels Set Levels as shown in the figure.
Apply Gaussian Blur


Set Blend mode to Soft Light
Step 6: Stop recording Action 
Go to Action Palette and click on Stop Icon as shown in the figure below;
Step 7: Open new image in Photoshop


Step 8: Apply Action to get the result 
As we have already create an Action named "gaussian_effect" in My_action_group set, we can simply play that action from action palette to apply it onto the new image.
Result:

Monday, October 1, 2012

Black and White Vignette Istagram Effect

This tutorial will show you step by step process of how to apply a black and white Vignette and Istagram effect to an image.


To download the stock that I have used in this tutorial click on this link.

Step 1:
First open up the image with photoshop.


Step 2:  Duplicate the original layer
to avoid any kind of changes to original image.


Step 3: Make some adjustments to the new layer

a) Black and White
Go to Image --> Adjustments --> Black and White
Leave the default values and click on OK.


b) Curves
Image --> Adjustments --> Curve
Set Output = 159
Input = 143

c) Levels
Image --> Adjustments --> Levels
Input levels:
4   --   0.74  --  207

RESULT of step 4


Step 4: Create duplicate layer of Action_layer as Action_layer copy


Step 5: Apply Gaussian Blur
Filter --> Blur --> Gaussian Blur
Set radius pixel to 4.6px


Step 6: Apply Layer Mask
With the Action_layer copy selected, click on add layer mask in layers palette.


Choose Gradient
Type Radial
Fore color - Black
Back color - White
Follow instruction in the given image

Then, click on the center of the image and drag it to any corner and release as shown the figure below:


After applying gradient mask we get the following result:


Step 7: Apply Vignette Effect to the Action_layer copy
Filter --> Lens Correction --> Click on Custom tab
Set Vignette amount to -100
Now its all done. Here is the final result that you will see:


Hope this tutorial was helpful for you. If you like this tutorial do not forget to hit like and share it to your friends. Thanks for reading.
Related Posts Plugin for WordPress, Blogger...